
Paper Tube and Tissue Paper Autumn Trees

This past week we to welcomed Autumn by reading a few or our favorite fall themed books* and by making our own autumn trees. 


Our Supplies: paper towel tube, scissors, brown marker, glue, green, red, orange, and brown tissue squares


Step 1: Cut strips 1/2 to 2/3 down your paper towel tube. These will become your branches. You can also cut the tops of the strips in to smaller sections to create more (smaller) branches


Step 2: Separate and twist your "branches" to form a tree shape


Step 3: Use the brown marker to draw bark on your tree trunk and branches.


Step 4: Apply small glue dots to a branch.


if the glue comes out in lines that's ok too :) 
Step 5: Crumble tissue paper and place it over glue

Step 6: Repeat steps 4 & 5 until you are satisfied with the amount of foliage on your tree.


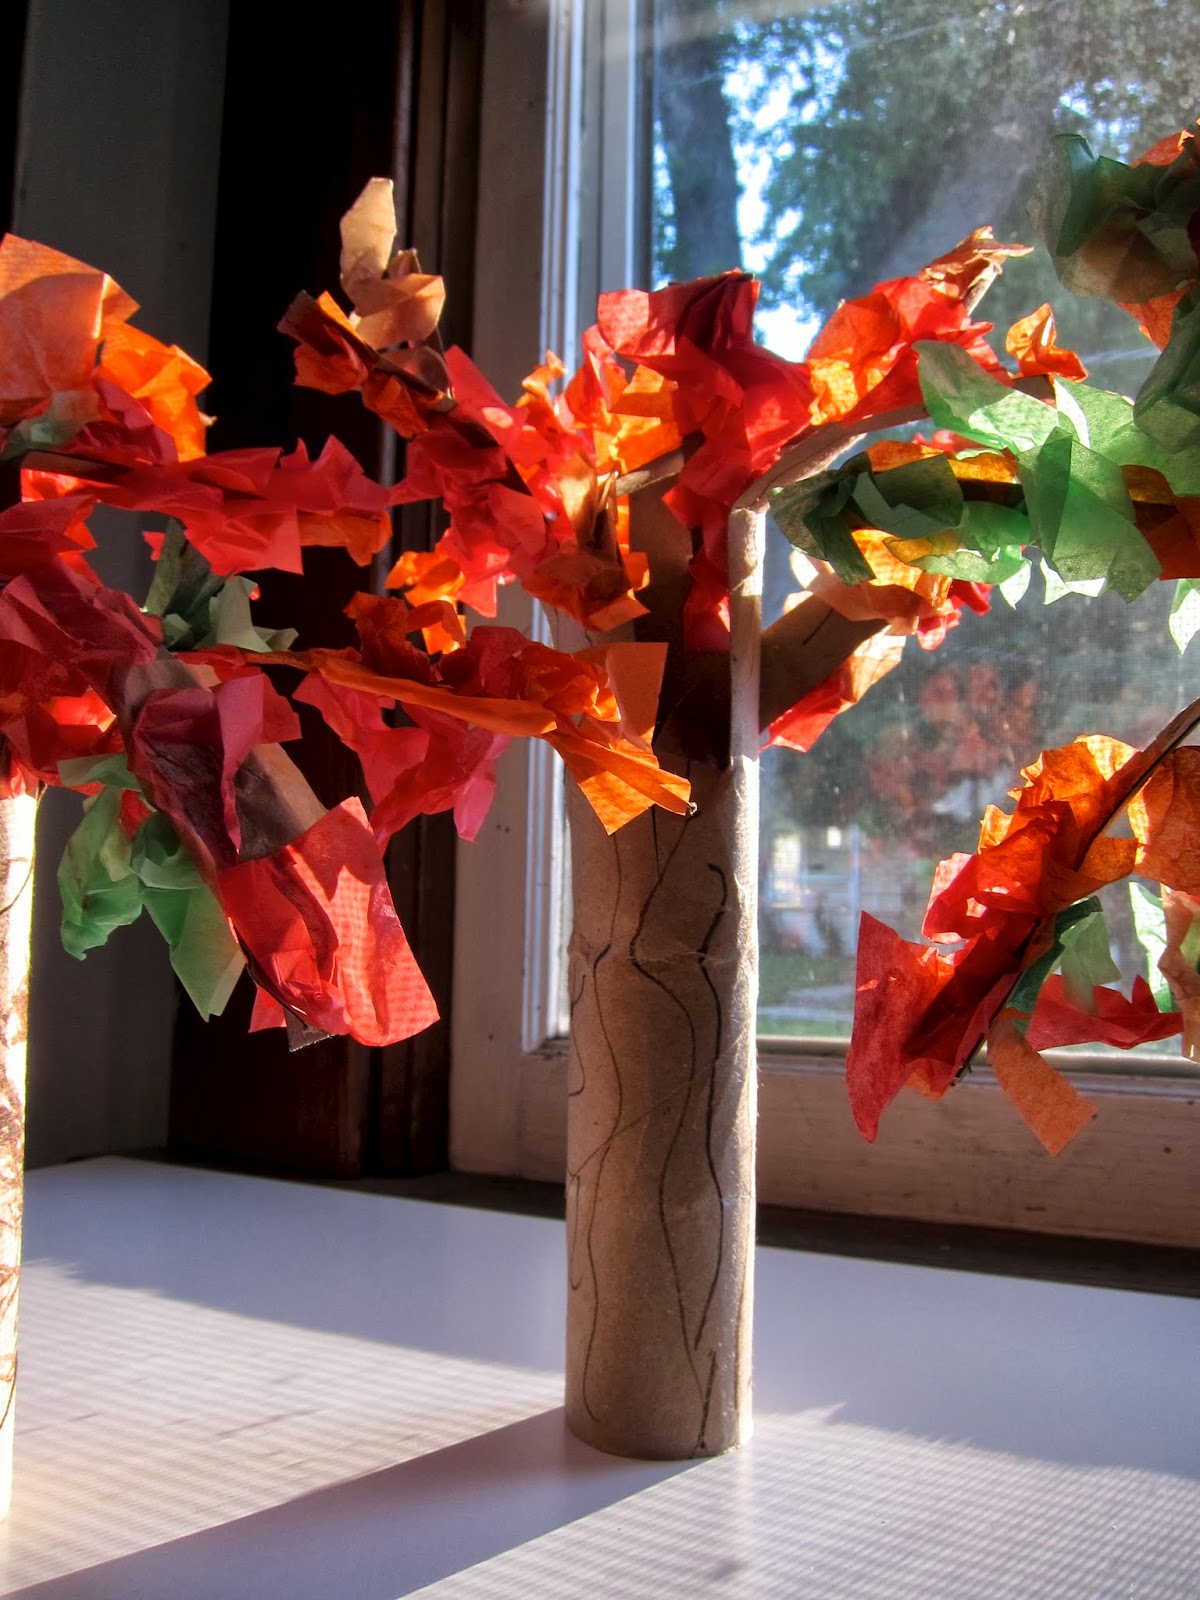
That's it, you now have darling miniature trees packed full of autumn leaves!


*Here are the autumn themed books we've been enjoying
  • Fall Mixed Up - a delightful book filled with silly mixed up verses and pictures that will have you and your children giggling. 
  • We're Going on A Leaf Hunt - a play off the popular song "We Are Going on A Bear Hunt" this book is perfect for reading/singing out loud. It's also offers a simple introduction to various types of trees. 
  • The Little Yellow Leaf - beautiful illustrations accompany this tale of a little leaf that is not quite ready to let go. 

If you a looking for more child friendly crafts or educational activities (autumn themed or otherwise) there are several on our homeschool page. 

p.s. lots more great kid friendly ideas can also always be found at these link parties: Link and LearnMade by Little HandsMontessori MondayHip Homeschool HopPreschool CornerFor the Kids Fridays, and Show and Share Saturday.

Comments

  1. How cute is this?! I love that your kiddos got to jump in and help you with this project - that makes it so much more fun!

    ReplyDelete
  2. This is adorable! I'm gonna do this with my kids soon. Found you from Montessori Monday!

    ReplyDelete

Post a Comment

Thanks for taking the time to leave a comment - you make me smile :)

Popular posts from this blog

A Little Red Cardboard Barn

We've finished our farm unit and are moving on to a new theme tomorrow - but before we do I wanted share the barn we made. The wooden farm animals came with a beautiful handmade ark that we gave Big Buddy for Christmas a couple years ago.  I would someday love to have a wood barn but it's currently not in the budget. So in the mean time we decided to improvise and make our own.  I stumbled upon this perfectly sized milk box (4 gallons per box) while subbing and thought it would be sturdy enough to handle play. Hubandie and the boys used an x-acto knife and wood glue to build a barn shape. to get the doors to fold out hubandie used an x-acto knife and scored the inside of the cardboard We then painted with a basic primer and outlined a window and a door with painters tape. cardboard is very porous so priming is a must if you want decent coverage Big Buddy however insisted that we add more windows so it looked like the barn in our book The Big

Preschool Syllabus: Dr. Seuss

Normally I'd do a Dr. Seuss unit in March around his birthday. We had to do one now though because on Saturday Big Buddy and I going on a date to a  Dr. Seuss exhibit . The exhibit is only at the museum until January and I'm afraid if we don't go now we might not get the chance. We are of course reading lots of Dr. Seuss's books. A great advatage to studying Dr. Seuss in November rather than March is that all his books were available at the library. I also found a great children's biography which is perfect for preschoolers. Pebble First Biographies: Dr. Seuss  We've read it a couple times and Big Buddy loves reciting all the facts he's learned WRITING CENTER ADDITIONS big buddy's name in sand paper letters, coloring pages  & mazes from seussville.com skills practiced: fine motor, letter recognition, creativity,  reading comprehension LEARNING "TRAYS" -   I rotate these, setting out about four a day from which the boy&#

Jack-O-Lanterns on the Fridge

Last fall I saw the idea for refrigerator pumpkins with face pieces in FamilyFun Magazine  and have been anxious to recreate them ever since. It was pretty quick and easy and since the only thing we didn't have on hand was magnetic sheets ($1.50 with coupon at Joann's) it was also very cheap. my supplies: magnetic sheets, orange & black construction paper, white pen, tacky glue *i know they have self adhesive sheets but my Joann's didn't carry them   glued (very messily) and ready to cut Both the boys were quite enthused when they discovered them after rest time :) Hopefully it will keep them entertained until we carve real pumpkins.