
Coffee Filter Butterflies

I'm not sure where I first read about/saw coffee filter butterflies but I know that I've done them with every group of children I have worked with since. Because the are simple, but allow for self creativity, they've been a hit with every age range from toddlers to grade schoolers. Truth be told, I enjoy making them myself and I'm thirty.

Even though we haven't been crafting much this summer (my boys prefer sand and mud to crayons and paint) I couldn't let our insect unit go by with out making them.


Our Supplies: 


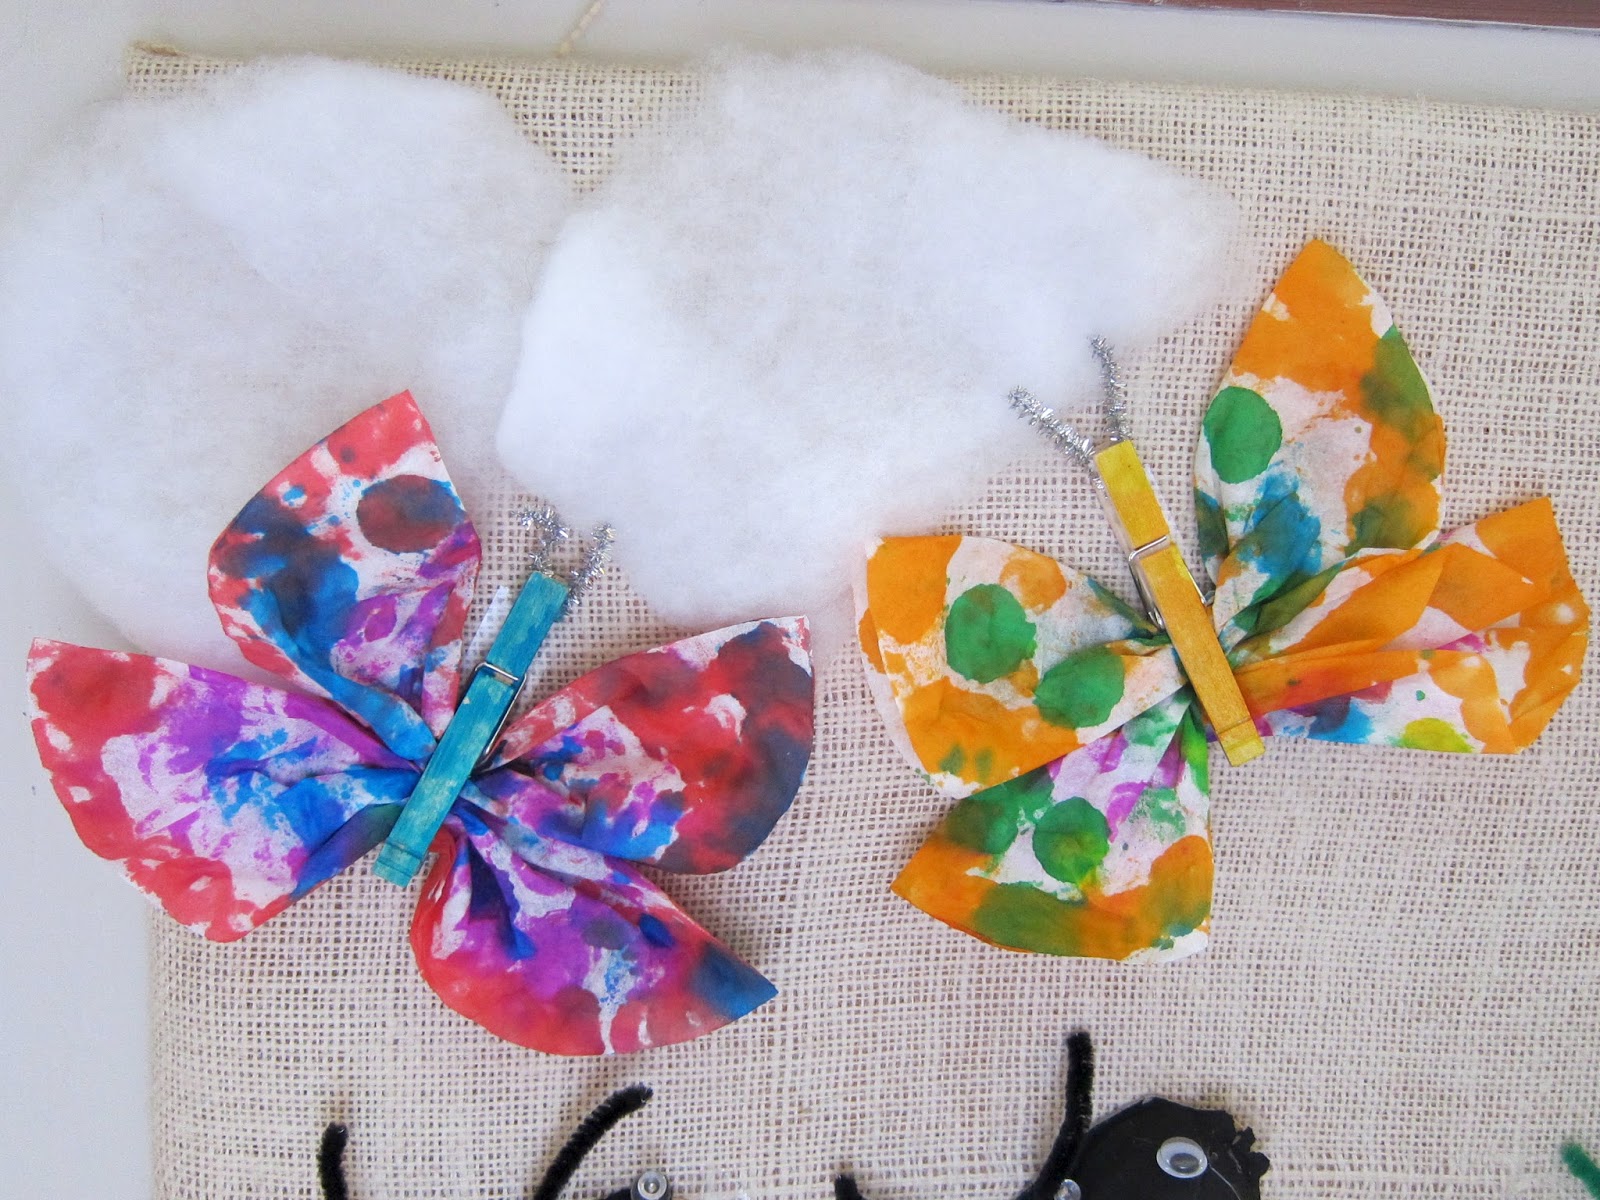
2 coffee filters, a clothespin, a pipe cleaner, scissors, glue, &  dot markers
*if you don't have dot markers using diluted food coloring (dipping or with droppers) works too


Step 1: use dot markers to decorate the coffee filters and clothespin


'

Mini Man's favorite color is green so he had a lot of fun mixing the blue and yellow. 


Step 2: once the coffee fliters are dry (the dry very fast - 30 mins) fold and pinch them to form wings. Then add a line of glue to the inside of the clothespin and place wings where desired.


Step 3: Cut pipe cleaners to make antennas 

Step 4: Put two small drops of glue on the top/clip end of clothespin and place antennas. *To help the antennas stay in place/dry I assist the kids in positioning them so they are held in place by the clothespin - once the glue dries they will stay in place even when he clothespin is opened.

That's it, your butterflies are ready to be displayed! We added ours to our bug mural. 

i don't have a post about the other bugs but they are made out of egg cartons, pipe cleaners, and clothespins

You can also add a adhesive magnet strip to the back of your clothespin and use your butterflies to decorate your fridge as well as hold grocery lists, etc - this makes a sweet gift for moms or grandmothers.


I'm really enjoying the splash of color these butterflies have brought in to our home..my boys are enjoying making up stories about them getting trapped in spiderwebs. 


PS. Coffee filters are one of my favorite mediums to use when crafting with kids. Here are some of our other coffee filter crafts: turkeys, peacocks, & flowers

More great kid friendly ideas can also always be found at these link parties: Link and LearnMade by Little HandsMontessori MondayMoney Saving Monday, Hip Homeschool HopPreschool CornerFor the Kids Fridays, and Show and Share Saturday.

Comments

  1. The wall is so cute! I'm sure the kids love seeing all of their projects displayed! :)

    ReplyDelete
  2. What a great idea! I've never heard of these, but I will definitely be trying them :-)

    ReplyDelete
    Replies
    1. Thanks for leaving a comment! These are probably my favorite craft! I hope you and your family have as much fun with them as we do.

      Delete

Post a Comment

Thanks for taking the time to leave a comment - you make me smile :)

Popular posts from this blog

A Little Red Cardboard Barn

We've finished our farm unit and are moving on to a new theme tomorrow - but before we do I wanted share the barn we made. The wooden farm animals came with a beautiful handmade ark that we gave Big Buddy for Christmas a couple years ago.  I would someday love to have a wood barn but it's currently not in the budget. So in the mean time we decided to improvise and make our own.  I stumbled upon this perfectly sized milk box (4 gallons per box) while subbing and thought it would be sturdy enough to handle play. Hubandie and the boys used an x-acto knife and wood glue to build a barn shape. to get the doors to fold out hubandie used an x-acto knife and scored the inside of the cardboard We then painted with a basic primer and outlined a window and a door with painters tape. cardboard is very porous so priming is a must if you want decent coverage Big Buddy however insisted that we add more windows so it looked like the barn in our book The Big

Preschool Syllabus: Dr. Seuss

Normally I'd do a Dr. Seuss unit in March around his birthday. We had to do one now though because on Saturday Big Buddy and I going on a date to a  Dr. Seuss exhibit . The exhibit is only at the museum until January and I'm afraid if we don't go now we might not get the chance. We are of course reading lots of Dr. Seuss's books. A great advatage to studying Dr. Seuss in November rather than March is that all his books were available at the library. I also found a great children's biography which is perfect for preschoolers. Pebble First Biographies: Dr. Seuss  We've read it a couple times and Big Buddy loves reciting all the facts he's learned WRITING CENTER ADDITIONS big buddy's name in sand paper letters, coloring pages  & mazes from seussville.com skills practiced: fine motor, letter recognition, creativity,  reading comprehension LEARNING "TRAYS" -   I rotate these, setting out about four a day from which the boy&#

Jack-O-Lanterns on the Fridge

Last fall I saw the idea for refrigerator pumpkins with face pieces in FamilyFun Magazine  and have been anxious to recreate them ever since. It was pretty quick and easy and since the only thing we didn't have on hand was magnetic sheets ($1.50 with coupon at Joann's) it was also very cheap. my supplies: magnetic sheets, orange & black construction paper, white pen, tacky glue *i know they have self adhesive sheets but my Joann's didn't carry them   glued (very messily) and ready to cut Both the boys were quite enthused when they discovered them after rest time :) Hopefully it will keep them entertained until we carve real pumpkins.